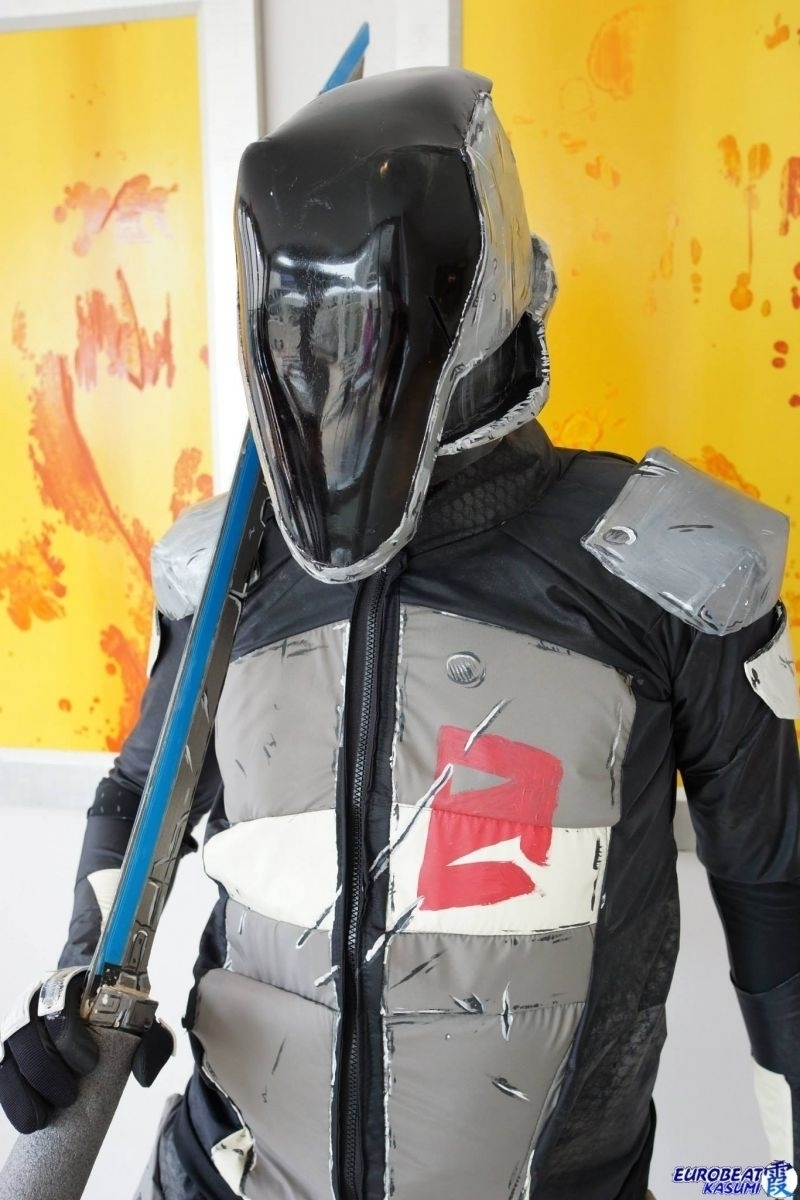
The one costume-piece I've created that I get asked about more than any other is my helmet for Zer0. I hear you, I really do. I scoured the internet when making that for ideas, too; it's a beast. The reason I hadn't written up a tutorial earlier is because I don't recommend making it the same way I did; I had some good ideas, but I also made it a lot harder on myself than I had to. You've been warned.
Materials
| Acrylic sheet | TAP Plastics | $22.92 |
| Wonderflex | Wonderflex World | $43.95 |
| Super glue | Michaels | ~$6.00 |
| Craft foam | Michaels | ~$7.00 |
| Gesso/acrylic paint/varnish | Blick Art Supplies | ~$30.00 |
| Spray-on tint | Amazon | $12.29 |
| Clear coat acrylic | Amazon | $5.66 |
| Terra cotta clay | Amazon | $31.87 |
| Paper clay | Amazon | $10.44 |
| Total | $170.13 |
Tools
- Heat Gun
- Scissors
- Dremel w/ cutting head
- Heat resistant gloves
Face Plate
 I'll go over everything I would have done differently in the Hindsight section below; this will just be a step-by-step of what I actually did. I knew the face plate was going to be the hardest part. I wanted to stay true to the character, with the entire thing being a single piece that curved up and over my head. First I looked into modifying a motorcycle helmet visor, but the simple fact is they don't make motorcycle helmets like that. I could have made it in multiple pieces, so that only the section around my eyes could actually be seen through (I have seen some Zer0s try that approach) but I thought it wouldn't look as good. That meant I would have to make it from scratch; I purchased a sheet of grey acrylic from TAP Plastics and a heat gun and went from there.
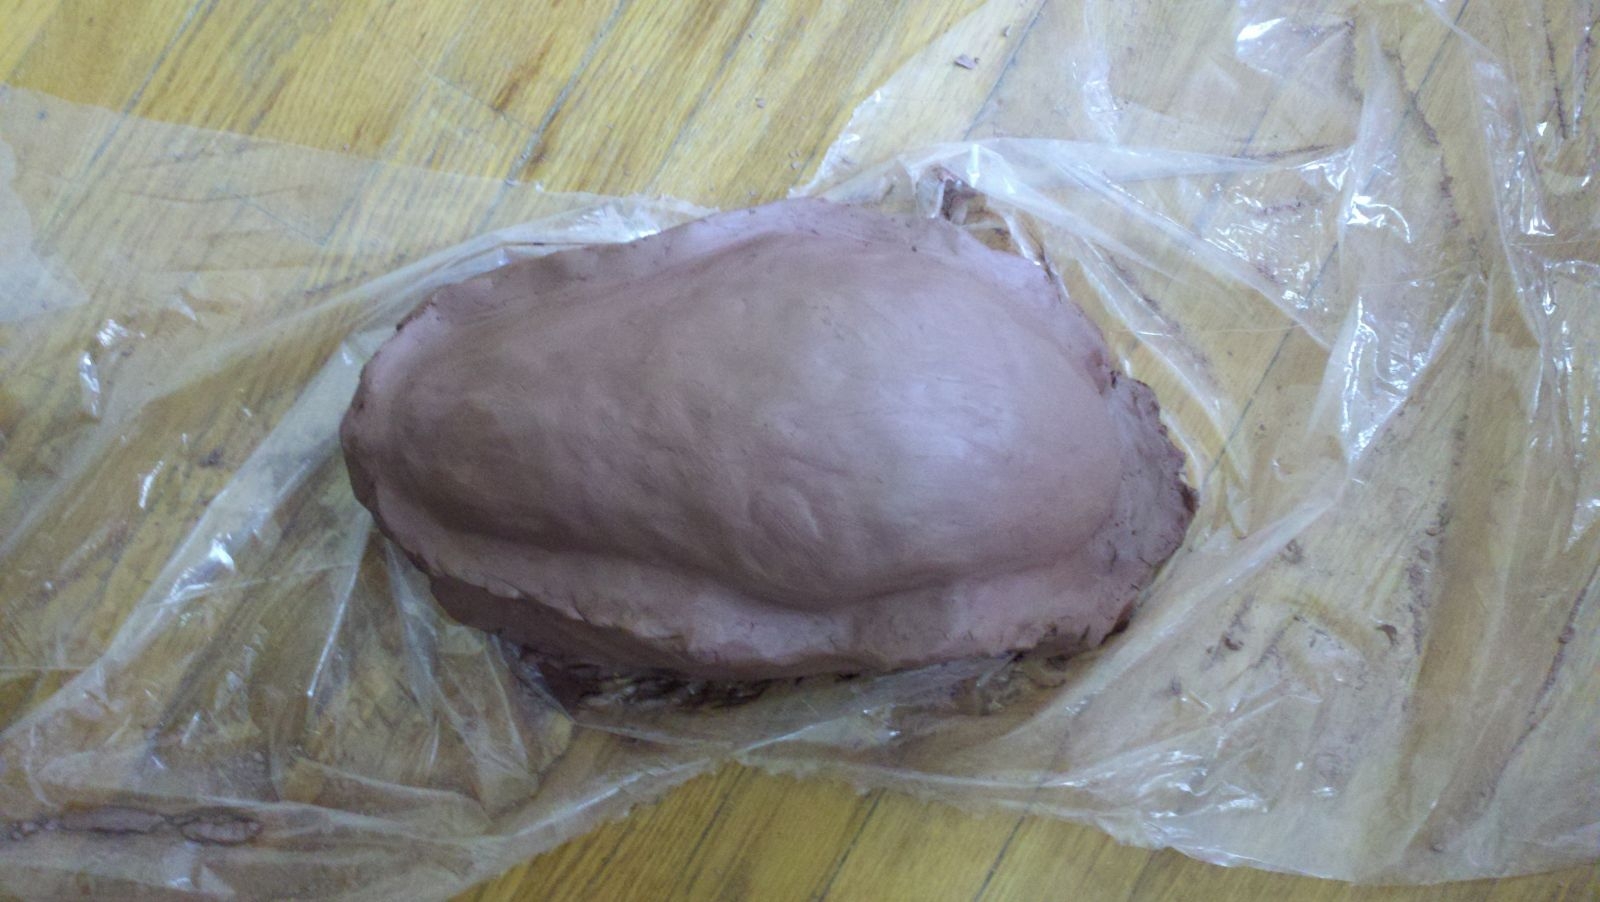
Because the piece on Zer0's helmet is noticeably thick, and because I'm a masochist, I got the thickest piece of plastic they sell. This, of course, made it harder for me to form. This is because I didn't have (or have the time to make/acquire) a vacuum former, so I had to form the acrylic by hand. To this end I used the terra cotta clay as my puck, shaping it (pretty much entirely with my hands, which was kind of fun) into the full visor shape. That's why I needed so much clay, because it needed to be bigger than my head. I first built the puck with a "lip" around the edges to delineate where I thought the visor should end, but as I was going I realized that was making my job a little harder, so I removed the lip and made the edges sheer.
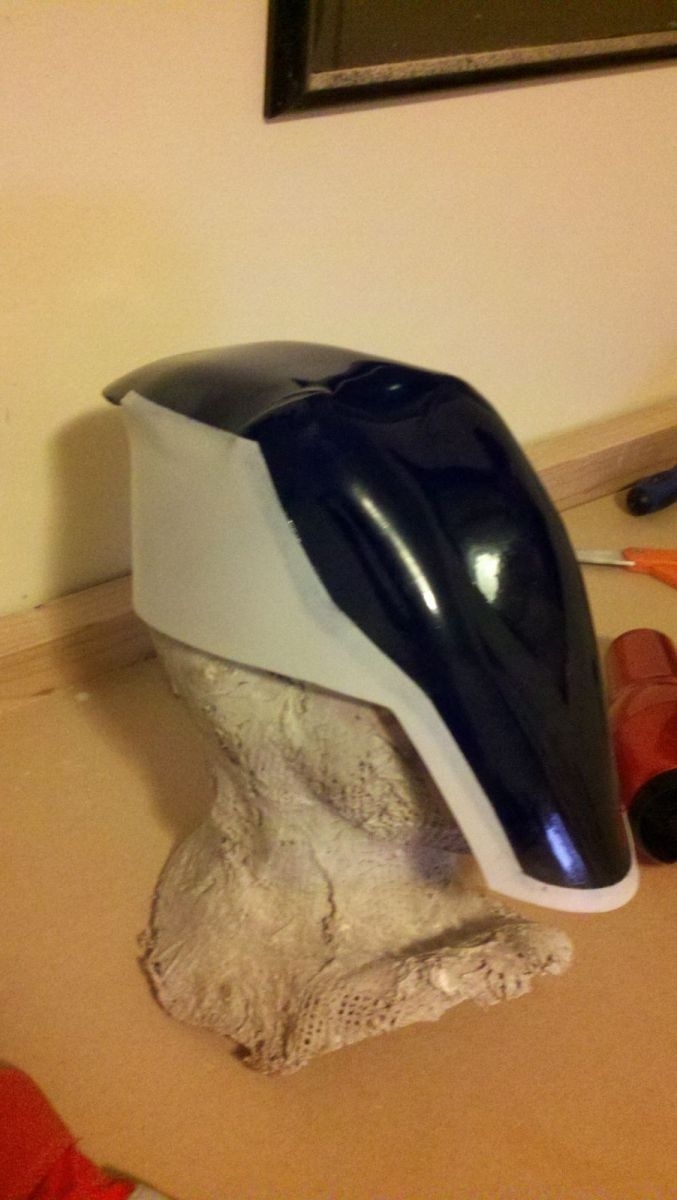
This next part was why I don't recommend this method: I spent pretty much an entire day shaping this visor. I would crank the heat gun all the way, focus on a section of plastic, and then push it down onto the puck with all of my strength (SAFETY NOTE: while wearing heat-resistant gloves!!). The initial bend (between the top of my head and my face) was super easy to get, but from there on out it was sweat and hard-work. What added to the challenge is that Zer0's helmet bends in two directions (and, as I said, I got a nice, thick sheet of plastic) which the plastic did not want to do. To solve this issue I actually put cuts in the plastic (with my dremel) at the bend points and tried to get the edges to line up. This was far from perfect, but with enough heat I got it fairly close. To get it the rest of the way I used the paper clay and filled in the gaps (and later painted it black to blend in).
As I started to get the shape about right I used my dremel to cut off any excess along the edges so that it had the nice curved edges the helmet displays. I had actually picked up a special acrylic-cutting blade for my jig saw but 1) it sucked, and 2) at this point the piece was too curved to use my jig saw anyway. Once I had it all cut (and sanded the edges with the dremel, too) I finished shaping it with the heat gun. At one point I did apply too much pressure near one of the bends and split the plastic! I swore a lot and applied more heat to try and merge it back together. I was mostly successful, and in the end I decided it would just look like some battle damage. It also gave me a tiny gap to see out of the helmet unobscured.
Once the visor was finished being shaped it was time to solve the "how am I supposed to see out without anyone seeing in?" problem. After reading up about it on the internet I came upon the idea to use spray-on tint. This worked perfectly. I put a couple of coats of it on the visor and BAM! I could see out and you could only sort of see in (and that sort-of was only because I didn't have the rest of the helmet blocking the back-light yet). I got a little too excited/impatient and, when I thought it was dry I sprayed on the clear coat. Mistake. It was not, in fact, fully dry. This caused the tint to run and made the visor a lot more blurry to see through. In the end it was okay, but it could have been perfect if I had waited a few more hours.
Sides/Back
 Now that I had a (more or less) functional, finished visor it was on to the "easy" part of the helmet, i.e. the part that makes it a HELMET. I started out thinking I would try my hand at pepakura, since there are pepakura files for Zer0 out there. After downloading one such file and reading up on pepakura I said "Oh helllll no" and immediately came up with a different plan. I do not have the patience for that, no sir. That said, the pepakura file and viewer made for excellent reference, since I could rotate it around and see the helmet from all angles. I highly recommend it.
I decided to fall back to my standard way of making stuff, which is to make patterns out of box board (I went through so many cereal boxes during this stage) to get the size right and then transferring these patterns to Wonderflex. I was a bit worried about how I was going to stick the Wonderflex to the acrylic visor, but in the end it was a combination of the glue that's naturally part of Wonderflex, and super glue. When I gave the super glue enough time the bond it created was really, shockingly strong. I have put this helmet through a lot of abuse since I made it and I've had no issues with this bond. The only issue I had attaching the Wonderflex to the visor was when the super glue dripped - it will strip away the spray-on tint in a heartbeat. Be very, very careful that you don't let it drip!
I had the advantage when forming this of having a bust of my head handy to build it around; we created this when making the helmet for Gaslight Hawkman. If I didn't have this I'm not sure how I would have formed the helmet. I pretty much just went through, cutting out Wonderflex to the correct pattern, heating it up, and attaching it. In the sections with a bit of depth I filled it in with craft foam.
When all was said and done I handed the helmet off to Fenix to paint (since she's the superior painter) and voila! An awesome, finished helmet.
Hindsight
So, as mentioned, if I had to do this over I would do it differently. While the sides and back of the helmet were actually pretty decent (mind-bending to try and change a 2D medium [Wonderflex] into a fully-realized 3D shape), the visor would have been vacuum formed. I had good reasons at the time for not vacuum forming the plastic, but the simple truth is it would have given a much better result. Also, as stated above, I needed to wait longer for the spray-on tint to dry, but that was just a dumb mistake. All in all, though, the helmet is my favorite part of this costume (well... and the giant sniper rifle).