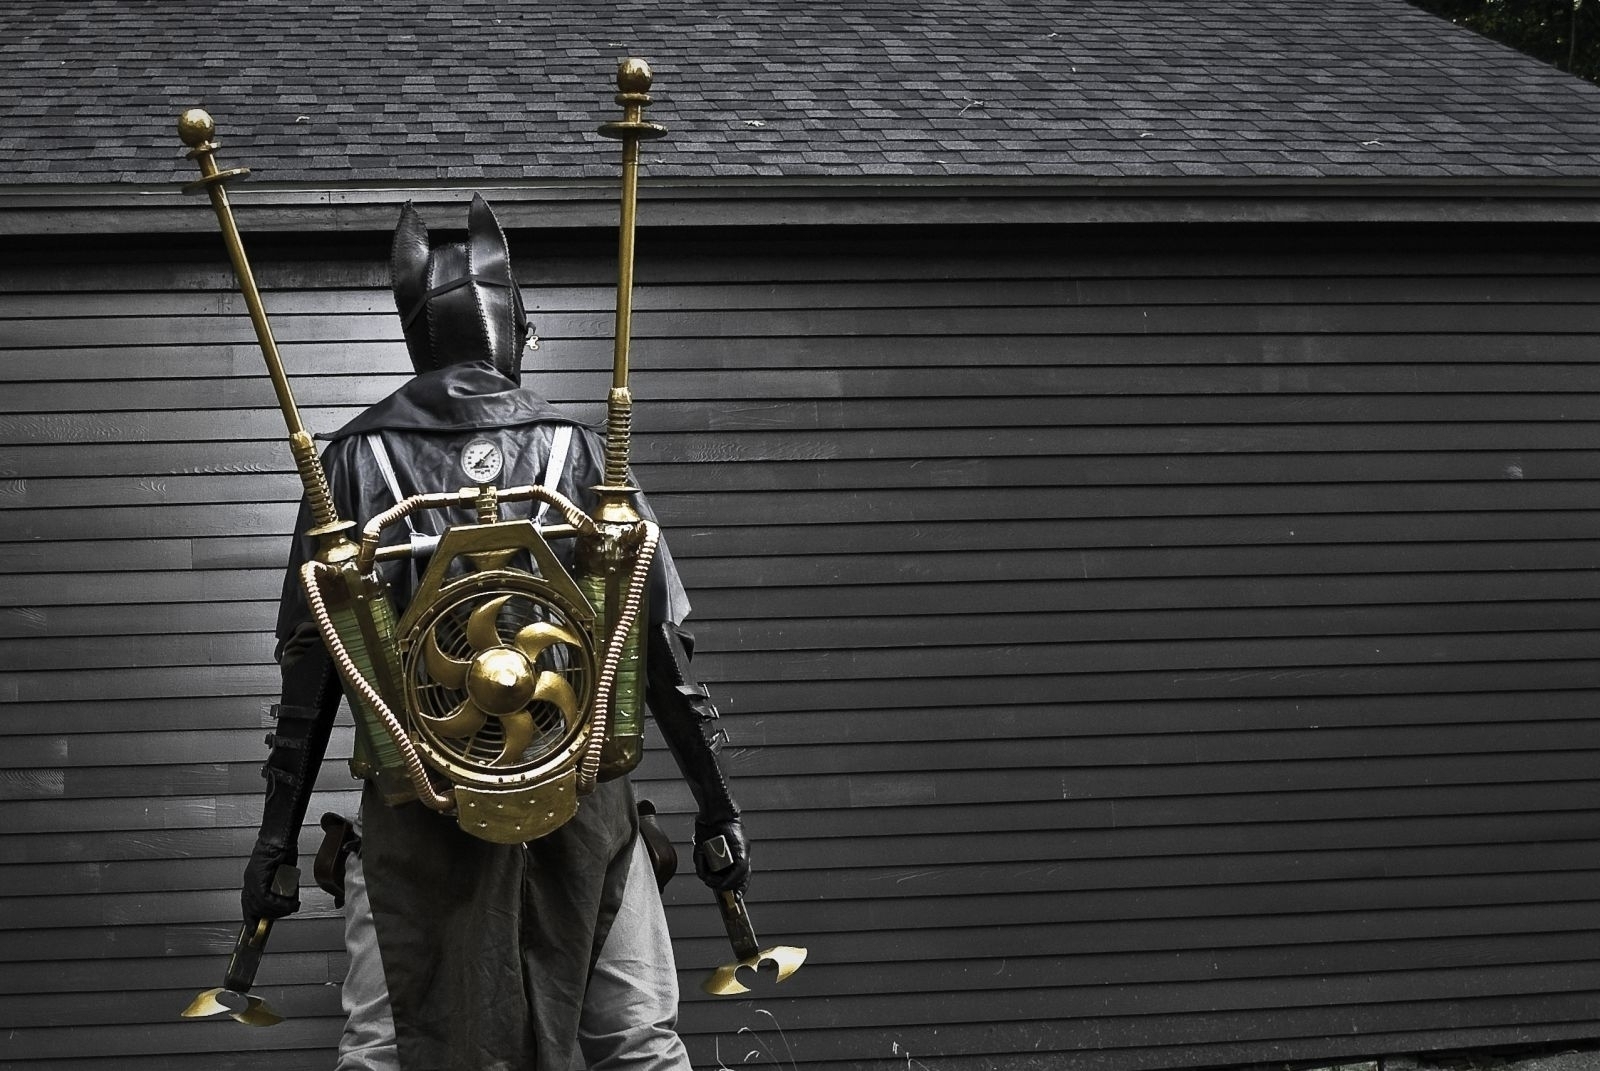
This tutorial is where I'm going to talk about how I made the power pack for Gaslight Batman as based on Infinite Crisis. Note that I went off of the revamped Gaslight Batman which, at the time of this writing, hasn't actually been released in game yet; the current version doesn't have this power pack, so you won't be able to find any reference yet.
Materials
| 2-liter soda bottles x 4 | N/A | |
| Insulation foam | Home Depot | $19.65 |
| PVC pipes, 1/2" x 10' | Home Depot | $1.81 |
| 90 degree PVC joints x 4 | Home Depot | $1.44 |
| T-style PVC joints x 4 | Home Depot | $1.84 |
| Small styrofoam balls x 2 | Michaels | ~$4.00 |
| PVC sheet | TAP Plastic | $10.00 |
| PVC pipe, 2" x 1' | Home Depot | ~$1.50 |
| Wonderflex | Wonderflex World | $43.95 |
| Cardboard coasters | Amazon | $15.67 |
| Yellow cellophane | Michaels | ~$3.00 |
| Fan | Amazon | $26.29 |
| Battery pack | Amazon | $4.66 |
| Electrical switch | Amazon | $3.96 |
| Electrical tape | Amazon | $6.45 |
| Wood | Home Depot | $6.49 |
| Acrylic paint/gesso/varnish | Blick Art Supplies | ~$30.00 |
| Nails | Home Depot | ~$3.50 |
| Pressure gauge | Home Depot | $4.94 |
| Ribbed metal tubes (2 long, 2 short) | Home Depot | ~$45.00 |
| Metal clamps | Home Depot | ~$4.00 |
| Googly eyes | Michaels | ~$2.00 |
| Expanding foam | Home Depot | $4.00 |
| 8 AA batteries | Amazon | $4.47 |
| Total | ~$250.00 |
Notes: I initially wanted to use coardboard coasters to fill in the volta batteries, but realized even the 100+ coasters wouldn't be enough to fill both batteries, so had to cut out some insulation foam to fill it out; in hindsight I didn't need the coasters at all. The insulation foam comes in huge sheets, but you won't need anywhere near that much for this project.
The wonderflex comes in huge sheets; you won't need the full sheet for this project, but it's useful stuff to have when making costumes.
The pressure gauge I link to isn't the one I used (I used this one) but it's cheaper and better suited. The wood I link to probably isn't the exact type of wood I purchased - I just grabbed something that seemed big enough, but not too big to fit in my (tiny) car.
Tools
- Hair dryer or heat gun
- Scissors
- Hand saw
- Hack saw
- Jig saw
- Electric drill
- Dremel w/ sanding and carving heads
- Hot glue gun
- Exacto knife/box cutter
Overview
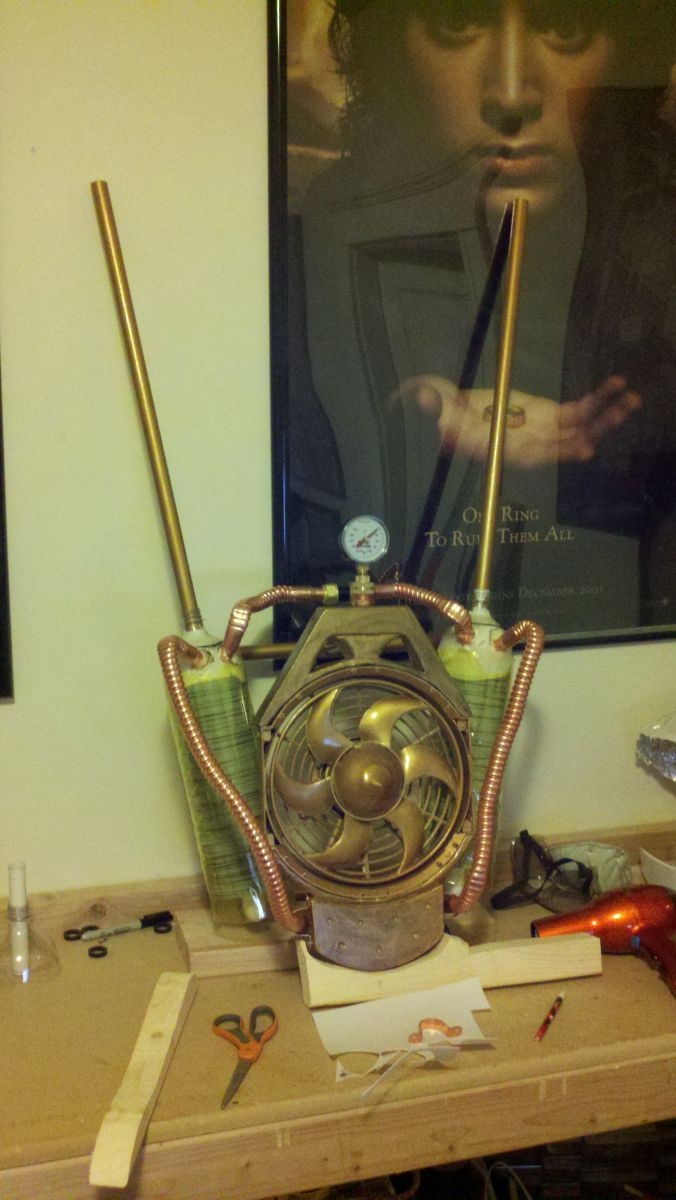
This power pack is broken down into several pieces: two Volta batteries that flank a (working) fan with Tesla rods sticking out their top. This consists of a hodge-podge of materials all stuck onto a PVC frame that will be where the harness actually attaches. The frame will be two horizontal PVC pipes at the top and bottom of the Volta batteries that extend away from Batman's back at either end to support the batteries and in the middle to support the fan. Remember to build the frame such that the batteries and slightly at an outward angle so that the tesla poles will point up and away.
Volta Batteries
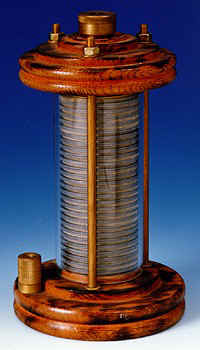 The two flanking tubes are meant to look somewhat like Volta batteries. An actual Volta battery is pictured to the left. I created my Volta battery by starting with some plain, 2-liter soda bottles. I used two soda bottles for each side, cutting off the bottom on all of them and cutting off the top on two of them. I discovered, to my pleasant surprise, that my PVC tubes fit perfectly down the throat of the soda bottles, so I kept the tops on two of the bottles to act as reinforcement.
As stated, the PVC frame was set up to go straight down the middle of the batteries to make them nice and sturdy. This means all of the coasters/insulation foam discs that we'll put inside need to have holes cut in the dead-center to be slotted over the PVC pipe. Speaking of those discs: we need to make them! As stated earlier, I ordered coasters to act as the discs, but when they arrived I realized I needed a lot more volume. I had been trying to avoid having to carve them out of insulation foam, but I decided to just bite the bullet and carve out a ton of discs. I traced the coaster onto my insulation foam, cut out a bunch of the cylinders with a hand saw, then cut those in thirds to make thick discs. I drilled out the middles, sanded down the edges, made sure they would fit in the soda bottle, then proceeded to paint the foam and the coasters a neutral grey color. I'll admit I was lazy: I pushed the discs/coasters onto the PVC and then painted them all at once; if I wanted to be thorough I would have painted them individually, but I figured it didn't matter and that would have taken forever.
At the bottom of the PVC pipe for the battery I put a 90-degree PVC joint for the frame. At the top of the battery (but below the mouth of the soda bottle) I put a T-style PVC joint so that the PVC could both go back for the frame and up for the tesla rod. You'll need to cut a hole in the soda bottle for the PVC to go back for the frame. I did this with an exacto knife. These can now be attached to the overall frame. I recommend painting any pieces of the PVC frame that will be exposed, and doing this before you start attaching it all. Before moving on to the next step I used some yellow cellophane and wrapped it around each battery, using scotch tape to hold it in place. Yellow is a major color for this character, and this helped tie it all together.
Fan
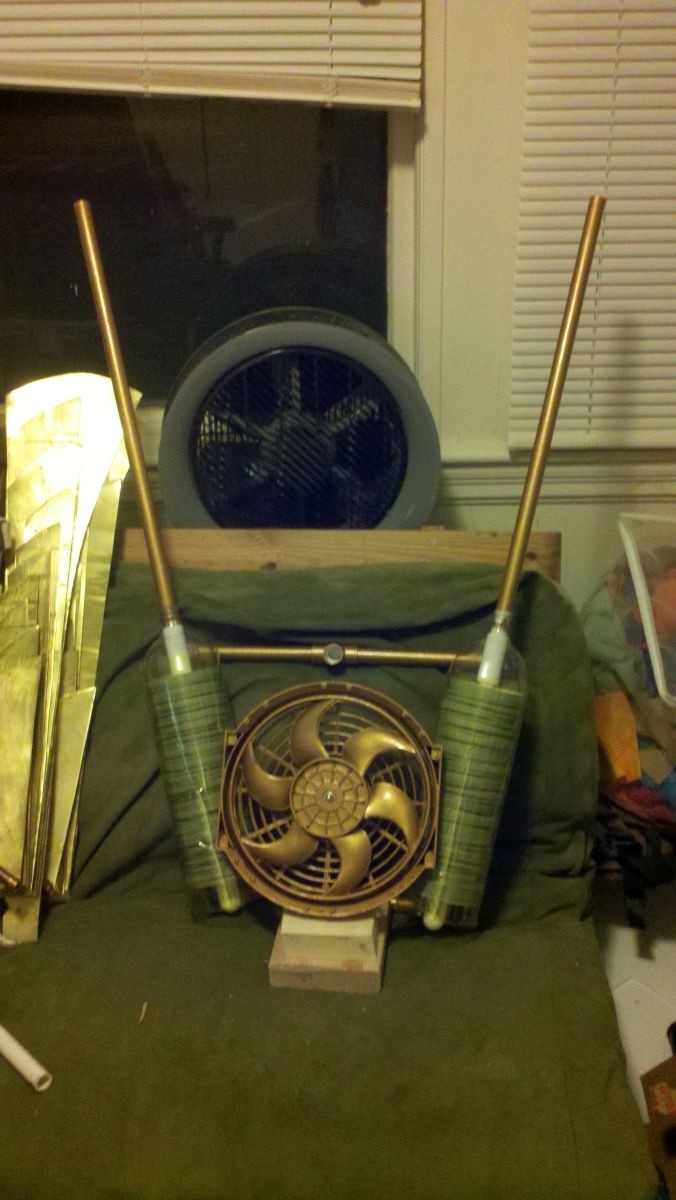 I decided that I wanted a little wow factor with this power pack, so I wanted a fan that I could actually turn on. I found a fan roughly the right size (honestly it's an inch or two too big, and that caused the entire power pack to be bigger than it should have been, but it was the closest I could find) on Amazon that I think is meant for a car? I also found a 12V battery pack (that takes 8 AA batteries) and a heavy-duty switch to turn it on and off. I started by taking the fan apart, painting it all gold, and putting it back together. I also wanted the center of the fan to extrude a bit (whereas the fan, by default, had an ugly flat section there), so after putting it back together I made a cone out of wonderflex, painted it, and glued it on. I didn't quite make it symmetric, so when the fan is slowly spinning you can tell the point of the cone isn't actually in the middle. Whoops.
For the support structure around the fan I decided to carve it out of wood in two pieces. As with any time I'm carving something I sketched it out on cardboard first to get the scale correct. Once I was comfortable with it I transferred the pattern to a 2"x8" wooden board with pencil and cut out the pieces with a jigsaw (with the help of my drill for the inner sections). Once it was cut out I began the annoying task of sanding it down and, more importantly, putting the appropriate notches and such in the edges that would be flush with the fan itself so that it would, in fact, be flush. It took a while to carve out all of the channels to make the odd shape of the fan work with the wooden pieces, but eventually they were flush to one another.
Next I figured out where the PVC frame would fall on the backs of the wooden pieces (i.e. where they lined up with the T-junction in the middle of the horizontal frame pieces. I drilled out holes for the PVC to set into in the backs of the wooden pieces. With this done I could actually set the wood and the fan onto the frame and have it stay there without even requiring glue - that's a sign you've made things the right size.
I also had a pressure gauge to sink into the top of the upper wooden piece. The gauge had a female ending, so I picked up a copper male-male adapter from Home Depot. I stuck the gauge on that and drilled out a hole in the wood for the other male end of the adapter. Next I needed to worry about electronics.
This was pretty straightforward. The fan had a power cable that ended in loose wires. I just slapped the batteries into the battery pack, connected one of the wires from the battery pack to one of the fan's wires, and then connected the other wires to the switch. I wrapped all of the exposed wires with black electrical tape and bam! You flick on the switch and the fan starts up!
Now I needed somewhere to hide these wires, batteries, and the switch. I figured I had a big piece of wood I could stick them in, and decided to carve out a hole for the battery pack and another, smaller hole for the switch (so that it would stick out the bottom of the backpack where I could reach it). I used a combination of my drill and dremel to do this; it was waaaay harder than it should have been. I have to be honest, I don't know what the right tool for this job should be, but this was a pain in the ass to carve out a rectangle. I only barely had enough depth/width for the battery pack to fit (the PVC needing to be in the middle of the piece mucked up my plans a bit) and I did slip at one point and broke through to the front of the wood. I smoothed it over and packed it full of paper clay to hide my mistake.
Once I had places for everything I passed off these pieces to Fenix to be painted (they're way better at painting than I am, so if it's not some minor little piece I let them handle it). Once they were fully painted I finally attached the wood to the fan. I did this with a combination of hot glue and nails; the fan had small holes where it was clearly supposed to attach to something, so I put thin nails through those holes into the wooden pieces. I then used hot glue to attach the PVC frame to the wooden pieces, and hot glue to attach the pressure gauge to the top. The fan is complete!
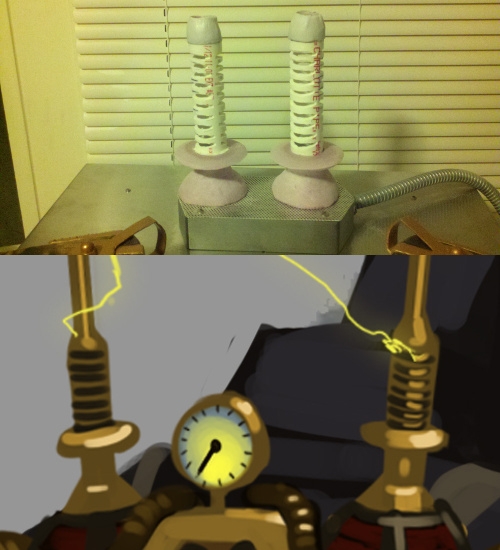
Tesla Poles
These aren't too bad. I'll go through the steps for building one of these, but remember you're building two. Start with a two-foot PVC pipe. Paint it gold, and sink it into the soda-bottle opening on the Volta battery. The top is going to be a styrofoam ball that we cover in wonderflex; if you get wonderflex hot enough you can smooth out a lot of the edges (which gives the final product a look of hammered metal, which I was okay with) so I mostly used some scrap wonderflex over the styrofoam ball.
Underneath the ball we'll have two discs of different sizes. I had some extra PVC sheeting around which worked perfectly for this. I cut out discs of the size I wanted and drilled out holes for the PVC. I was worried I would have enough surface area to make it attach to the PVC, so I created little shelves out of wonderflex. I did this by wrapping wonderflex around a scrap piece of the PVC pipe (making sure that the glue on the wonderflex didn't stick to the PVC) and then adding a flat section with overlap to the top to attach to the disc. I hot-glued the shelf to the disc. I did this for each disc, and this also made it easier to dictate the spacing between the discs. Once I finished that I found I could put it onto the PVC pipe and it would stay put without any glue.
 The last bit of detail for the tesla rod is the point at which it meets the Volta battery. This goes over the mouth of the soda bottle, hiding it. I made this out of three pieces - first I used some scrap 2" PVC pipe I had lying around, and cut grooves into it. I then cut out a the bottom portion of this section from insulation foam and carved it out. I carefully drilled/carved out the middle so I could partially sink the 2" PVC pipe into it. Note that the 2" PVC is the perfect size to just screw onto the top of the soda bottle. The top I made with a little more insulation foam, quickly carved out, and then covered in wonderflex. I covered it in wonderflex because I was worried the foam would be too thin otherwise. The bottom-inside I carved out so that it would be flush with the soda bottle. I glued all of that together, painted it, and then attached everything to the Volta battery. Be sure to push the bottom decoration on first, then the big disc, then the little disc, and finally the sphere. The only part I actually hot-glued on was the sphere; the rest stayed on without any problem without glue (though you're welcome to use glue if your pieces aren't quite as snug).
Volta Battery Details
 Now it's time to add all of the details to the Volta batteries. It's important to wait until after the previous steps are finished so you'll know exactly how much space you have to work with. First we're going to want to attach the ribbed metal tubes. I bent them by hand into the correct shapes; this was tricky to do without mangling the tubes, but manageable. The two long tubes went from the top of the Volta batteries to the wooden bottom of the fan, and the two short tubes (this could potentially be done with another long tube) connected the two Volta batteries at their tops, bending behind the pressure gauge. Where the tubes connected to the Volta batteries I cut out holes in the soda bottles using the exacto knife. This was, obviously, very loose. I had a rough idea of how I would secure it, but I was worried it wouldn't be enough. To alleviate my concerns I (temporarily) put duct tape over the gaps in the soda bottle and then filled the top of the soda bottle with expanding foam. This worked surprisingly well; the foam hardened up, securing the tubes, and I could remove the duct tape (which was just there to keep the foam from going everywhere). The foam kept oozing a little, so I had to wait for that to stop, cleaned it up, and continued.
The other end of the ribbed metal tubes connected to the wood with some copper brackets screwed into the wood. That still didn't quite work, so I also wrapped the brackets with Wonderflex (and reinforced that with superglue). The upper tubes I wanted to connect to each other in the middle, but they both had female ends, so I just wrapped the two ends together with wonderflex to make it look seamless.
Next up I used a ton of scrap wonderflex to reinforce the metal tubes, going about an inch up the tubes and spreading the wonderflex around the top of the soda bottle (up to the edge of the tesla rods). I also created a domed bottom to each of the Volta batteries with scrap wonderflex, leaving the necessary gaps for the PVC frame to poke through. With that done I cut strips of wonderflex to bridge the top and bottoms of the batteries, and finally I hot glued some googly eyes to these "bridge" pieces (two for each piece, one at the top and one at the bottom) to be fake rivets. If you line it up correctly one of these bridge pieces can help hide the cellophane seam in the back. I then painted all of the wonderflex I just added. With that finished the power pack should be done!
Harness
You will need a harness to hold this piece of awesomeness on your back. I recommend veering slightly away from the concept art for this so that you can have a more stable and comfortable harness. Real world physics != video game physics.
Materials
| Grommets | ||
| Sturdy grey cloth, 1 yd. | Fabric.com | $7.97 |
| Buckles x 3 | Tandy Leather Factory | $3.00 |
| Thread | Joann Fabrics | $2.79 |
| Belt tips | Amazon | $14.95 |
| Total | $28.71 |
I only needed two belt tips, but they come in packs of 100. So... yeah.
Tools
- Sewing machine
- Needle
- Grommet tools
Construction
I'm not going into Gaslight Batman's utility belt in this tutorial, but make sure you keep it in mind when building the harness, since it sits over the harness. The harness followed a similar style as the harnesses I built for Gaslight Hawkman and Hawkgirl - you can read more about how I made those on the wing tutorial. Similar to that one you'll be sewing reinforced strips of fabric that will wrap around the PVC frame and then go around your waist and over your shoulders. The difference here is that instead of using plastic, click-in-place buckles to hold the harness in place I put a series of grommets along the front-upper strap and had a metal buckle on the lower strap it needed to connect to. The strap with the grommets was capped with a belt tip to prevent fraying, and because it looks cooler.
I didn't add any sort of cross piece to the front, since I wanted it to look like the concept art, but this was a MISTAKE. I will be adding some sort of cross piece to make it sit tighter before I wear this costume again. The power pack is heavier than I expected and it pulls down and back. I fixed the pulling down issue by dropping the lower horizontal piece of the frame to sit flush with the belt portion of the harness (this fully supports the bottom of the power pack, though it's now sitting lower than I'd prefer), but it still pulls back (away from me). I'm hoping a cross piece will alleviate this, but I'll update this tutorial when I've tried it.
Hindsight
I think the final product looks incredible, but it has a couple of major problems. Things I should have kept in mind from the get-go: transportation and weight distribution. I should have made the pieces able to come apart so that I could more easily transport the entire thing; as it is it takes up my entire trunk (and just barely fits). It wouldn't even be that hard, you could just make the tesla rods screw in (instead of being stuck in) and it's immediately much smaller. If you really wanted to go for gold you could make the ribbed metal tubes separate in the middle, and make the PVC frame come apart. You could then have it break down into its 5 component pieces: the two volta batteries (with metal tubes sticking out), the two tesla rods, and the fan.
The other major mistake was the harness. Again, I was too focused on making it look like the reference that I didn't keep in mind the physics of how it would rest on my back. If I had made a cross harness to better support the weight and extended the frame down past the bottom of the power pack to rest against my butt I think it would have been a lot more comfortable; while I can't easily make the latter change I'll definitely be reworking the harness before I wear this costume again.